Category Archives: celebrating

Thanksgiving -The Third Blog Post

Wow – this is our 6th blog entry already and next week is Thanksgiving. We are focusing on the meal and table today. Every celebration needs a nice centerpiece, and we saw one which showed a flower arrangement in a pumpkin. We did our own take on that. Also, we have a recipe we got from Rachael Ray a few years ago. We’ve changed it up a bit to make it healthier, yet still delicious! Enjoy!

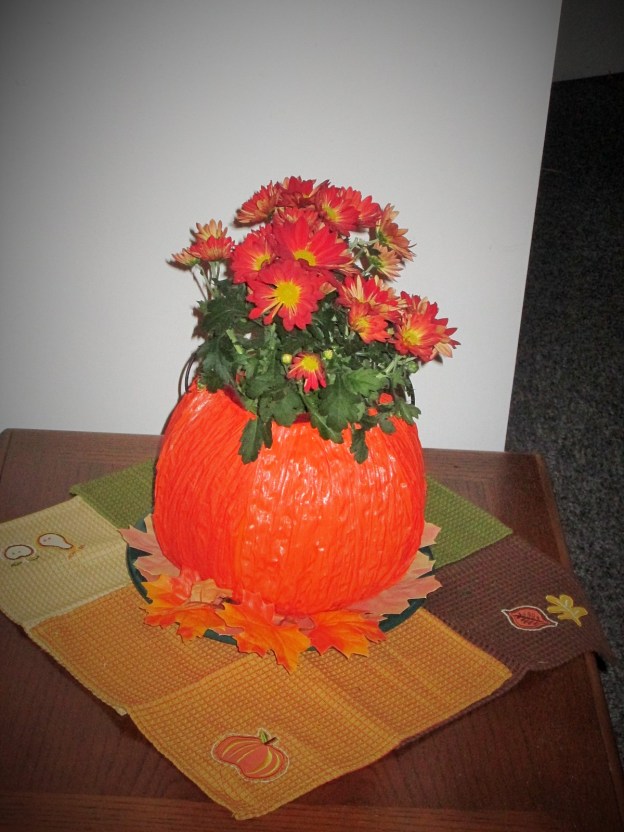
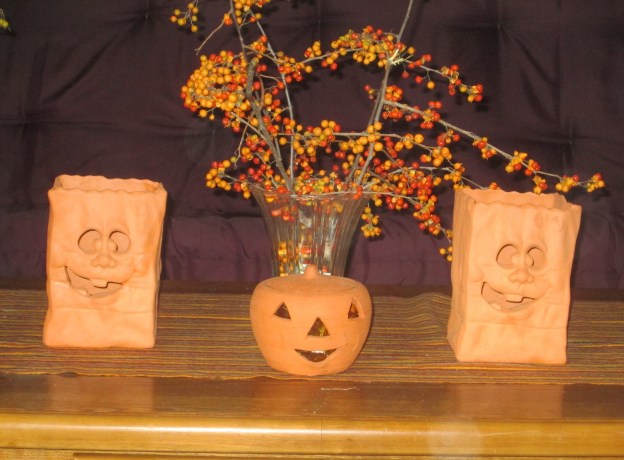
PUMPKIN & FLOWER CENTERPIECE

IMG_2744

Looking for pumpkins the week before Thanksgiving can be tricky. In our area, they are not easy to find (or else we are looking in the wrong places – hmm, could be). Anyway, we adapted and created the pumpkin vase (pictured above) using the plastic pumpkin in the photo to the left.

For an 8-inch plastic pumpkin, you will need: 80 inches of orange (or the color of your choice) twisted paper cord (one brand available in most craft stores is called creative twist), hot glue gun and glue, small pot of mums or your favorite fall flower that will fit into your pumpkin. Our plant is 4 inches in diameter and 12 inches high.

  • Untwist paper cord and cut into eight 10-inch strips. When untwisted, the paper cord is about 4 inches wide.
  • Cover the Jack-O-Latern’s face with one of the crepe paper strips. You may have to cut the strip in 2 and piece them together, depending on the Jack-O-Lantern design. Secure with hot glue. (The face needs to be covered twice for this project so it will not show.)
  • After the face has been covered once, and starting next to a handle, cover the pumpkin by applying the strips vertically. Glue top of strip 1/2″ into inside of pumpkin. Add glue to middle of crepe paper strip and then glue to the bottom. Overlap strips by about a 1/16th of an inch as you go around.
  • Insert plant.

 SWEET POTATOES WITH BANANAS

IMG_2743 (2)

We tweaked a great recipe we saw Rachael Ray make so it would be healthier. Go to foodnetwork.com for the original recipe for Rachael Ray’s wonderful Mashed Sweet Potatoes.

Here is our version with less fat and sugar:

Ingredients:

  • 3 pounds of sweet potatoes, peeled and cut into chunks.
  • 2 tablespoons light margerine (with no hydrogenated oils)
  • 1 sliced banana
  • 1 orange, zested and juiced
  • 1 cup low sodium chicken stock
  • 1/4 cup brown sugar
  • 1/2 teaspoon nutmeg
  • Salt and pepper to taste
  • 1/4 cup chopped pecans or walnuts

Directions:

Boil potatoes about 20 minutes until tender, drain and put potatoes aside. In the original pot, add margerine and banana slices.  Cook the banana 5 minutes on medium heat and add the juice of the orange. Allow the orange juice to cook out for about 1 minute. Add the potatoes back to the pot with the stock and brown sugar. Mash together until its well mixed. Season with nutmeg, salt, pepper and orange zest to taste. Mash to combine, top with 1/4 cup of chopped walnuts or pecans.  WE LOVE THESE SWEET POTATOES!!

JOKE OF THE WEEK:                                                                                                                                       Can a turkey jump higher than the Empire State Building?                                                             Yes! A building can’t jump at all!

Joke source:  Kidsactivities.net

FUN FACTS: According to the website Life123 the first Macy’s Thanksgiving Day Parade took place in 1924. It was known then as the Macy’s Christmas Parade. Today, the parade is attended by an estimated 3 million people and is viewed by approximately 44 million people all over the country.

Thanks so much for reading, following and sharing these blogs. We have been having fun creating and writing.

1 more blog post before Thanksgiving! Gobble Gobble!

Roy & Kevin

Thanksgiving post number one! The holiday blogfest continues!

Thanks for looking at this blog and at the previous Halloween blog entries. If you haven’t seen the others, please check them out. The fun part for us is creating new things and coming up with fresh ideas every week. This week we show how you can switch things up and make the transition from Halloween to Thanksgiving decorating simple. The Pumpkin About-face Switcharoo takes seconds, and is great for a quick start of your holiday redecorating, and the Happy Thanksgiving banner uses elements of the Halloween banner, for an easy transition.  And it looks great!

PUMPKIN ABOUT-FACE SWITCHEROO! This is a simple trick to switch over from Halloween decorations to Thanksgiving. Simply turn the Jack-O-Lanterns around so the face is toward the wall and the plain pumpkin side faces front. Some of the pumpkins shown above were featured in the 2nd Halloween blog with their smiling Jack-O-Lantern faces. The plain pumpkins are more suitable for Thanksgiving.

HAPPY THANKSGIVING BANNER

IMG_2683 (3)

  • Last week, we showed a Halloween banner made with burlap painted with black paint and hung clothesline style and secured with painted clothespins.
  • This week we used the same lines , hung 11″ apart, one over the other, and added 3 more clothespins (18 total for this).
  • For the letters, we cut card stock into 18 rectangles 4.5″ X 3.5″ and cut capital letters out of contrasting paper. (Shortcut: Using 3 X 5 plain index cards would save cutting time and that size works well too.) We used yellow for the base and purple, red and orange for the letters. We had those on hand. Use your favorite colors.
  • Secure letters with glue stick.
  • For the word HAPPY, we hot-glued plastic leaves to the clothespins.
  • For THANKSGIVING, we used scotch tape to secure leaves to the back and bottom of the card stock/index cards. We did the same on the side of the first and last letter .
  • Adjust and center letters for your desired look.
  • Embellish with turkey, pilgrim, cornucopia, or Thanksgiving stickers if desired.
  • Keep it neat, but don’t worry about perfection, the casual look is part of it’s charm.                   (Hmm.. you may be noticing a pattern here!)

A FEW MORE THINGS:                                               

STOCK UP ON STUFFING! According to livescience.com :                                                   “American’s gobble up 46 million turkeys at Thanksgiving” Wow!

THANKSGIVING JOKE OF THE DAY:                                                                                                          If the Pilgrims were alive today, what would they be famous for? Their age!                Source: enchantedlearning.com

Thank you all for following and sharing these blogs! We appreciate your interest!

More next week, including a great craft project and a simple but surprising twist on a classic Thanksgiving recipe! Check it out!

Thanks again,

Roy and Kevin!

Halloween Blog 3 (the final chapter)


This is our 3rd Halloween post for the year. We are still learning and having fun, creating new things and sharing a few ideas. This week we are focusing on the Happy Halloween Banner and some other random yet (hopefully) interesting Halloween and fall related things.

IMG_2671 (2)

HAPPY HALLOWEEN BANNER: We saw a banner in a store not too long ago, and we decided to design our own and put our own twist on it. The banner we came up with is simple to make. We made ours out of things we had around the house, but if you were to buy the items, you could probably do it for under $10.00  Let’s make this a banner year!

You will need: 15 5X7 inch rectangles of burlap, 5-6 feet of Jute or ribbon, acrylic paint; black and orange, 15 wooden clothespins. tacks to attach banner to wall.

To make the banner: 

  • Cut fifteen 5 X 7 inch rectangles out of burlap. Iron them with a t-shirt or towel over them.
  • Using black acrylic paint, paint one letter vertically on each rectangle spelling out                   H A P P Y  H A L L O W E E N ! in approximately 4 inch capital letters.
  • Paint 15 wooden clothespins orange. Allow rectangles and clothespins to dry.                          ( about one hour)
  • Cut 5-6 feet of Jute or ribbon, hang 2 ribbons 11 inches apart one above the other.
  •  Attach to the wall by tying the ribbon to tacks with the ends 5-6 ft apart  (or what works for you).
  • Using the orange clothespins, attach (letter-by-letter) HAPPY to the top ribbon, HALLOWEEN to the bottom.
  • Center and adjust for your desired look.

NOTE: Perfection is not the goal for this project: burlap frays, clothespins can be tricky to paint, and hand-lettering is a challenge for some people, but that is part of the charm of this banner.          (That’s my story and I’m sticking to it!)

RANDOM STUFF:

Here’s another picture of our Halloween decor.

IMG_2655 (2)

TREAT TRICK: An easy way to make popcorn balls is to use the Rice Krispies treat recipe (on the box or online), use  the same amount of popcorn instead of Rice Krispies!

PETS WARNING: Remember chocolate is toxic for pets, keep the kids trick-or-treat candy out of their reach! (The pets reach that is, well maybe the kids too!)

GO FLAMELESS: Flameless candles make for a safer Halloween. Use them in Jack-O-Lanterns and all over the house!

JOKE OF THE WEEK:  What’s the problem with twin witches?                                                                                                You never know which witch is which!                                                                                                                                        (Source: jokerz.com)

Up next week: Thanksgiving!

Thanks everyone for reading this and the other entries. Please share, like and follow!

We wish you and yours a Happy, safe and creative Halloween!

Roy and Kevin

Halloween Blog 2 (the sequel)!

PUMPKINS AND SCARECROWS AND GHOSTS -OH MY!!

 Post number 2!  We had fun putting up the last post and are still learning about this blogging stuff.  Anything worth learning is going to take some time. We are just starting the process of creating a routine for getting more of these posts out with better and better content.

Last Sunday we decorated our place a little bit with the contents of the buckets of Halloween items we have collected over the years  We used that as inspiration for the few tips we are sharing this week. The Lighted Stacked Jack-O-Lanterns are so simple and affordable. The scarecrow ideas we share make use of household items and thrift store finds. We hope you like these ideas and are enjoying this magical holiday season!

ADD A LITTLE PUMPKIN SPICE TO YOUR DECOR!

IMG_2653 (2)Decorating tip: The Lighted Stacked Jack-O-Lanterns shown here is a cute display that is easy to create.  You can make this for under $10.00.  We had 3 pumpkins but needed a forth. We also needed a set of lights. We went to Target and bought the pumpkin for $1.00 and a set of lights for about $5.00.  Start with four plastic pumpkins that are the same size. The ones here are 8 inches. Using a utility knife, cut the bottoms out of the 3 top pumpkins. The very bottom of these pumpkins are usually thicker plastic, so cut along the edge where it is thinner and easier to cut. Stack them together with the uncut one on the bottom and string lights through them from the top. Our’s shown are just stacked, but you may want to attach them together with duct tape in the back. The light shines through the plastic and gives the room a great glow!

SCARECROWS!

I made the scarecrows shown at the top of this page. I made mine like dolls, and used thriftstore clothes. There are other ways too. Included here are a few tips for making scarecrows :

  • Children’s feet pajamas make great scarecrow bodies. Just stuff them and dress them. Dress them in used clothes , either your own or some bought from a thrift store.
  • Heads can be made from paper bags, burlap sacks, wig heads, and as one tip from Martha Stewart suggests, use (clean and empty) laundry detergent bottles, upside down using the handle as a nose.
  • Stuff with fiberfill for a more permanent indoor scarecrow.
  • Give your scarecrow personality. Maybe glasses and a book for a studious scarecrow, tie-dyed shirt for a 1960’s inspired scarecrow, etc.
  • Gloves for hands, shoes for feet, buttons for eyes.
  • Finish with straw and  plastic leaves for a realistic look.

Vignettes! We like to group like items with like items. This decorating idea works in all sorts of decorating situations, holiday or not. Here (below) is a ghost vignette with some of our favorite ghost decorations we have collected and created though the years.

IMG_2660

SPOOKTACULAR!

Joke of the week: What do ghosts eat for breakfast? Boo-berry pancakes!

MORE NEXT WEEK!

THANKS TO ALL WHO READ THIS AND LAST WEEKS POSTS! PLEASE SHARE FOLLOW AND LIKE.

ROY AND KEVIN

New Holiday Blog Project!

IMG_2640 (2)What’s it all about

We have been thinking about blogging for years. I figured that the holidays would be a good time to start, as we always have lots of creative holiday ideas and there is a lot to write about. With that said, we are launching our HOLIDAY BLOGFEST!! Every week between now and January 1st we will post a blog about the holidays with ideas and other (hopefully) interesting content. Our focus is that   creativity can be simple and affordable and it can make life more fun!

Today we’ll start simply with just a few items:

FIRST HOLIDAY: HALLOWEEN!

Craft tip: The little ghosts shown in the photo above are an easy party favor you can make. Wrap a lollipop with a white napkin. Tie with a ribbon or rubber band, use a marker for eyes, and you have cute ghosts. BOO!

Decorating tip: Tie string to witches hats and hang them from the ceiling!

Hats


FUN FACT: The first Jack-O-Lantern was actually made from a turnip. Source: Randomhistory.com

QUESTION OF THE WEEK: What was / is your favorite Halloween candy??

At Halloween, don’t worry about dusting, think of the dust and cobwebs as free decor!

KUDOS TO: Kevin for taking the great photo of the pumpkin on the stairs in Provincetown fall of 2012. ( shown above)

A BIG THANK YOU to the Warwick RI Public Library and wonderful  instructor Reza Clifton for the great blogging  and social media class they presented.